
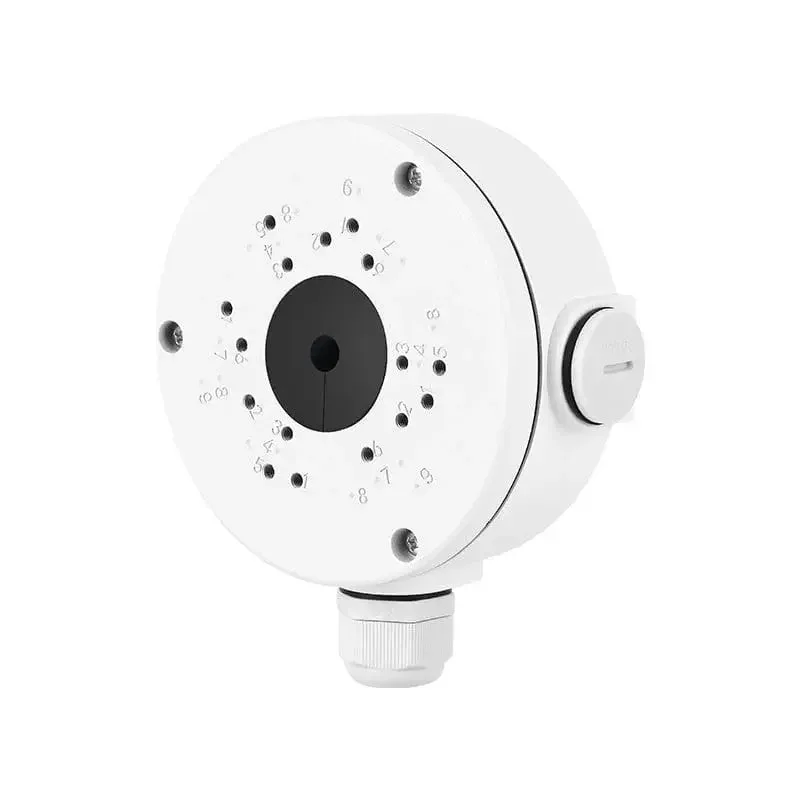
A security camera junction box should solve a specific installation problem: sheltering connections, creating room for a cable tail, or providing an approved mounting base. Choose it around the camera and the wall, rather than its appearance. Before ordering, collect the camera model, base measurements, connector dimensions, cable route and photographs of the mounting surface.
First decide whether the box supports the camera
A connection enclosure and a camera mounting base are not interchangeable. Some boxes accept a camera directly; others sit beside the camera and only contain its connections. Check the installation instructions for the exact model. A flat lid, spare holes or a similar diameter do not establish that it can carry the camera.
Lorex illustrates this distinction clearly: its JB301 guidance describes direct attachment for compatible fixed cameras, while its AJLP-1W installation guide tells installers to mount the camera beside the box. These are examples of different mounting arrangements, not compatibility or load specifications for QuarkView accessories.
Match the hole pattern and camera base
Compare the mounting drawing with the actual camera base. Record the number of fixing holes, their center-to-center spacing, base diameter or outline, screw size and required thread engagement. Also check whether an adapter plate is required. Hold the approved parts together before drilling the wall; the cable exit must line up without trapping the camera tail.
Do not drill extra holes into a box or substitute screws unless the manufacturer approves the change. A screw that is too long can interfere with the inside of the enclosure; one that is too short may not secure the base. Confirm that the finished camera can still turn and tilt toward the intended view, and that the lid remains accessible for service.
Allow room for connectors and maintenance
Measure the assembled connection, not just the cable diameter. An Ethernet plug, the camera socket and its waterproof connector sleeve occupy more space than an unterminated cable. Include any separate power or audio tails that must be protected. Make a dry fit with the real components and verify that the lid closes freely without pressing against a plug or gasket.
Leave a practical service loop so a technician can open the enclosure and inspect the connection without pulling on the camera. Avoid tight bends and follow the cable manufacturer’s bend-radius guidance. Support the incoming run separately so its weight does not hang from the socket. Larger connectors or several cable tails may require a deeper enclosure rather than a larger-looking lid.
Plan the entry route and sealing together
Choose rear or side entry to suit the wall penetration and the permitted fittings. Use glands, grommets, plugs and conduit adapters specified for the enclosure and cable. A gland must suit the cable’s outside diameter and the opening thread. Close unused entries with the correct parts. For knockout enclosures, follow the model’s removal instructions and remove sharp burrs before routing cable.
Keep outdoor connections protected even when the camera housing has an ingress rating. A housing rating does not prove that an exposed plug, wall penetration or modified enclosure is sealed. Seat the lid gasket cleanly and check that no wire crosses it. Follow the manufacturer’s sealing instructions at the wall and connector; do not treat tape around a joint as an equivalent enclosure specification.
Where the approved routing allows it, arrange an exposed cable with a downward drip loop before the entry so rainwater can fall away. Keep a manufacturer-provided drain or ventilation feature in its prescribed position. Do not drill a drain hole, seal a designed vent or invent a drainage arrangement: these changes can affect protection and need model-specific approval.
Check the wall and complete the installation
Consider the combined camera, box and accessory weight and the support required by each component. Use fixings suitable for the actual substrate. Loose siding, thin panels and damaged masonry need assessment rather than a larger screw alone. When structural support is uncertain, have a qualified installer determine a suitable fixing method before mounting the equipment.
Test the camera and cable before the final closure. Once power is disconnected as required by the equipment instructions, secure the box, route and protect the connections, and fit the approved camera or separate mount. Tighten fasteners to the specified instructions. Restore power, confirm the image and recording, and check that adjusting the camera has not twisted the cable or loosened the base.
Use this handover checklist
- The camera model, mounting arrangement, hole spacing and supplied hardware have been checked.
- The assembled connectors fit; the lid closes without pressure and the service loop remains usable.
- Cable entries and unused openings have the specified fittings; the gasket is clean and correctly seated.
- The surface and fixings support the installation; the camera, box and cable run remain secure.
- Live view and recorded playback work; installation photographs and the accessory model are saved for maintenance.
Reinspect after severe weather or nearby work, and at intervals appropriate to the environment. Look for loose fittings, corrosion, cracked seals and evidence of moisture. Stop using an unstable mounting assembly and correct its support before returning it to service. A clear handover record makes it easier to order the right replacement gasket or accessory later.
Related product and installation guidance
The pictured QuarkView YN-BOX-CWB is an example junction-box product. Request its mounting drawing, usable internal dimensions, approved camera fit and installation instructions before ordering; this guide does not establish those specifications.
View the YN-BOX-CWB junction box
Plan an outdoor camera installation
Check Ethernet, coaxial and power cable routing